The Mastery Series – Chapter 2: Introducing The NCAT Ignition Oven
Almost every lab in the country has an ignition oven. Sure, there are some standouts; some states require extractions with solvents, but for the most part, ignition is king. But how did this become the standard? Why did everyone switch from extractions to ignition seemingly overnight? What even is an ignition oven anyway?
In today’s chapter of the Mastery Series, we are going to cover a piece of equipment that changed an entire industry. And whether you use one or not, your testing procedures are the direct result of this oven.
Table of Contents
History of Testing Asphalt

Two of the most critical tests for design, quality control, and quality assurance of asphalt mixtures are determining the asphalt content of your mix and figuring out what combination of aggregates are included in your mix.
We need to know how much asphalt cement (AC) there is because it’s the most expensive part of our mix, and balancing cost and performance is basically the reason we have jobs. Also, the state says we have to do it.
We also need to know what different size aggregates there are so that we know what the road structure will be and what the volumetrics are. Also, the state says we have to do it.
Using Solvents

In the past, companies mostly relied on chemical extractions to determine the asphalt content of their mixes. Chlorinated solvents were used to separate the asphalt cement from the aggregate easily. The only drawbacks were trying to figure out where to dump the hazardous chemicals and the extreme danger to health and safety, but hey, it was the 80’s.
This process stripped the aggregate of all of its binder, which made it really easy to perform gradations. Compared to all other methods of the time, solvent extractions were by far the fastest way to determine asphalt content.
There was a push later on to switch to biodegradable solvents, but these required changes to the test procedure and would often take a lot longer than just using Trichlor.
The Nuclear Approach

Nuclear asphalt content (NAC) gauges were used in some states to determine asphalt content. The NAC gauge would measure the amount of hydrogen in a mix and from that could figure out the amount of asphalt present. From start to finish, the test took approximately 20 minutes to complete.
Although NAC gauges didn’t require any solvents to work, they also didn’t strip the binder from the aggregate, so gradations couldn’t be done. Also, because the gauges measured the amount of hydrogen, aggregate with a higher moisture content could interfere with the results.

The Ignition Method
In 1969, the National Cooperative Highway Research Project (NCHRP) and Clemson University jointly performed a study suggesting that the ignition method be used to determine the asphalt content.
The study was headed by Antrim and Busching, who subjected asphalt mixes to 843°C (1550°F) and a lot of butane to burn off the binder. They found that although the binder was removed from the aggregate, limestone and other similar aggregates would experience significant mass loss during their tests. In some cases, the loss was as high as 1%!
NCAT’s Attempts To Develop A New Method
In the early 90’s, the National Center for Asphalt Technology (NCAT) performed some testing based on the study by Antrim and Busching. They were looking to produce a method that was reproducible no matter where testing was done and wanted to eliminate using hazardous solvents from the industry.
Over the next few years, they made changes to their testing, and by the end, they were able to produce results within 45 minutes and were able to perform gradations on the aggregate at the end of every test.
Test Temperature
One of the first things NCAT did was lower the test temperature significantly. While 843°C finished the test time in a little under 30 minutes, the mass loss of aggregates was too high.
They eventually settled on 593°C for their tests. The total time took about one hour and forty-five minutes, and didn’t result in a significant amount of aggregate loss.
Test Container
In the beginning, a small round bottom porcelain dish was used as the sample container during burns. Unfortunately, the liquid binder would flow towards the bottom of the dish, which resulted in hours of cleanup and extended test times.
They decided to use a flat surface, thanks to research being performed at Universita’ Di Ancona in Italy, and used a commercially available stainless steel pan to put the sample in. To maximize the use of space, they placed 2 trays in the oven at a time, split the sample in half between them, and stacked them on top of each other. This resulted in burn times of two plus hours, and so eventually, they replaced the solid metal bottoms with a mesh tray, which brought the time down to 45 minutes.
More Air
NCAT quickly realized that more oxygen was needed to produce a better burn. They decided to change the test equipment to pull air through the unit, instead of forcing air inside. This resulted in a total time of around 30 minutes.
Specialized Equipment
NCAT needed a furnace that could use all three of these improvements so that they could test their theory out in the real world. A few companies were approached, but in the end, Barnstead was chosen as the manufacturer.
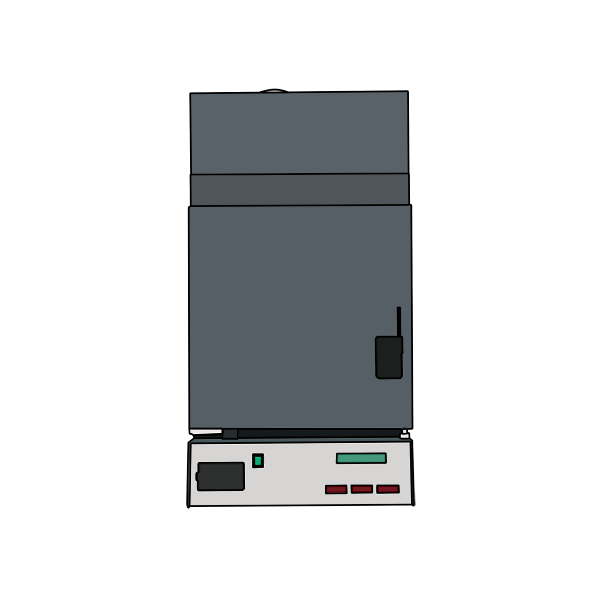
The NCAT Ignition Oven Was Born

Barnstead worked with NCAT to optimize the design of their new furnace by using all of the different improvements to create a single test system. The NCAT ignition oven is the result of this collaboration.
The Three Main Components
Barnstead’s ignition oven was made up of 3 main components to assist in performing the ignition method: the Scale, the Heating System, and Airflow.
The Scale

There needed to be a way for the test to be performed automatically in order to truly benefit asphalt testing. There were already “ignition ovens” on the market where the technician would place their sample in a furnace, pull it out, weigh it, and then put it back in and repeat. This resulted in longer test times and would make adoption of the method really difficult in the industry. After all, solvents could do this in a much shorter time.
Thus, Barnstead, with the help of NCAT, integrated a scale in their unit that would measure the weight loss during the test and determine when the test was done.
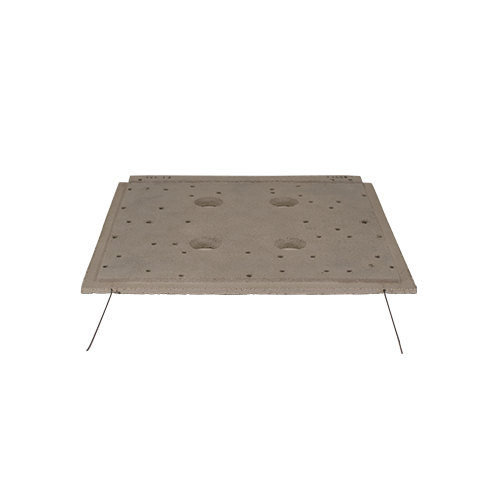
The scale is made up of a few different parts: The scale body, the Ceramic Tubes, and the Plate that the sample baskets sit on.
Naturally, the scale (although technically an electronic balance) would need to be able to handle intense heat. Therefore, the sensitive electronics are contained in a metal body with a type of insulating material keeping its components cool.
The scale is further insulated from the heat by being outside of the burn area. This is done through the use of ceramic tubes, which extend the scale platform up, and by a ceramic hearth plate, which is what the baskets sit on.
- Technician Note: If your scale is showing incorrect or jumping readings, your ceramic tubes might be touching the holes cut out in the bottom of the chamber.
The Heating System
Making the chamber hot is relatively simple if you don’t need to account for airflow or higher temperatures. Naturally, this ignition oven needed to do both and also take emissions into account.
Asphalt is dirty stuff, and when heated, it produces a lot of smoke and ash. Barnstead needed to develop a system that would be able to catch the ash and burn it up while simultaneously taking care of the smoke.
If they didn’t, then they would have to replace components after every test and scrub the exhaust tube daily to run their unit. Thus, the ignition oven’s blower motor (which pulled air through the system and forced it out through the exhaust tube) needed to be shielded to extend its life.
Barnstead and NCAT jointly came up with a filter system that would use a single afterburner heating element and two filters to trap the large pieces of ash and burn them down to a smaller size fit for exhaust. This system also happened to scrub the air of smoke, which made emissions much more manageable.
Next came the design of the burn chamber. Barnstead would use the heat from the afterburner to assist in the chamber. They would also include 2 side heating elements and 1 additional bottom heating element. They had to take special care to design the bottom element.
The bottom element needed to be sturdy, as all of the chamber elements would sit on top of it. It also needed to allow enough air to pass through to create good conditions for ignition while also not evacuating all of the heat from the chamber.
Airflow
Airflow throughout the binder ignition oven was essential for ignition to occur. Through initial testing, it was found that 50 liters per minute (1.76 cfm) was ideal for the burn. This meant that whatever blower motor they chose had to keep up with the temperature, provide a chamber airflow of at least 50 liters per minute, pull that air through all of the filters, and shoot out the exhaust at the end.
In the end, they went with a high-temperature motor that could do all of that and had enough protection to last through repeated burns.
Major Success
Thus, the NCAT ignition oven swept the country and eventually the world. While there are now many different units available, they all perform the test in a similar manner. The test temperature has been reduced down to 538°C and we have heard rumors of talks to lower it down even more. The ignition method changed the face of asphalt testing and even became a catalyst for new equipment designs and principles.
6 Tips On Lowering Your Burn Time
Whew, that was a lot of information! Thank you for taking the time to learn with us on the history of the ignition oven and how it works. Now, as promised, I’ll share some of our best tips to lowering burn times.
- Clean your dang unit.
Seriously, you need to vacuum out your unit to prevent the buildup of ash. This ash lowers your airflow, which as you remember, is critical to things catching on fire. Focus on the top of the unit especially to keep the ash at bay.
- Check your elements
Make sure that your elements are all heating properly. Elements that are out don’t provide heat to your chamber and also suck out heat energy. This two-fold issue causes really long burn times and can even impact your final results.
- 1” of distance
When you put your sample in each basket, make sure you leave an inch of space along the walls. This allows better airflow for both your top and bottom baskets and will ensure your burns ignite better.
The motor goes through a ton of abuse during burns. And since we know now how important it is to the function of your unit taking care of it should be a no brainer. Oil your motor to make it last.
- Use our triple basket
Larger samples take a lot longer to burn. Our triple basket adds an additional basket set to allow you to spread your sample across three baskets instead of two.
- Use our calibration services
We don’t need to tell you that there are some shady companies out there. We covered the essential questions you need to ask to make sure that you’re using a reputable service company, but if you want the best performance out of your unit, you should choose us.
References
Brown, E. R., Murphy, N. E., Yu, L., & Mager, S. (1995, March). Historical development of asphalt content determination by the ignition method. Transportation Research Record, 1499, 17-23.
Kandhal, P. (2004, October). The history of the National Center for Asphalt Technology. Asphalt Institute.
Black, K. N. (1995, Winter). The nuclear asphalt content gauge. Public Roads Magazine, 58(3), 18-25.